Features
Why Sked?
Sked Social is a third party app and is not affiliated with or endorsed by any social network platforms.
See our Terms & Privacy Policy.
See our Terms & Privacy Policy.
© 2024 Sked Social. All rights reserved.

Quick and easy workarounds to get your exact brand colours incorporated into your Instagram Stories and Reels.
Consistent branding builds loyalty. Your followers should be able to spot your content in their endless feed, without even looking at the username. One way you can do this is by incorporating your brand colours in the on-screen text you use when publishing your Instagram Stories and Reels.
Unfortunately, Instagram’s colour palettes within Stories and Reels are limited to generic presets or a colour selector tool with no way to identify the proper colour codes. Luckily we know a few workarounds to get your exact brand colours incorporated into your content. 😏
If you're looking for a quick video tutorial, check out this Reel we created. If you prefer written instructions, read on!
There are a few different ways to do this and the process is the same for both Stories and Reels. All of these methods involve using Instagram's colour dropper tool. Let's start with the method we most commonly use.
Basically what we're going to do is save an image of our colour palette to our device, use Instagram's image sticker to insert it into the Story or Reel, and use the dropper tool to colour match. Let's walk through it.
Before we do anything, we want to make sure we have an image of our colour palette saved to our camera roll. This can be a screenshot from your brand book, a colour wheel made in Canva or any image that has all of your required colours on it.
PRO TIP - we have a folder dedicated to brand assets so it never gets lost in our endless camera roll
Whether you're using a pre-recorded video, adding an image from your camera roll, or recording on the spot, start your Story or Reel like you normally would.
How to start an Instagram Story:
How to start an Instagram Reel:
Once you have your picture or videos added, click the screen or the Aa symbol in the top bar to add your text. Type out what you want it to say and choose the text style you want by swiping through the options. You can also choose to animate your text by clicking the symbol on the right.
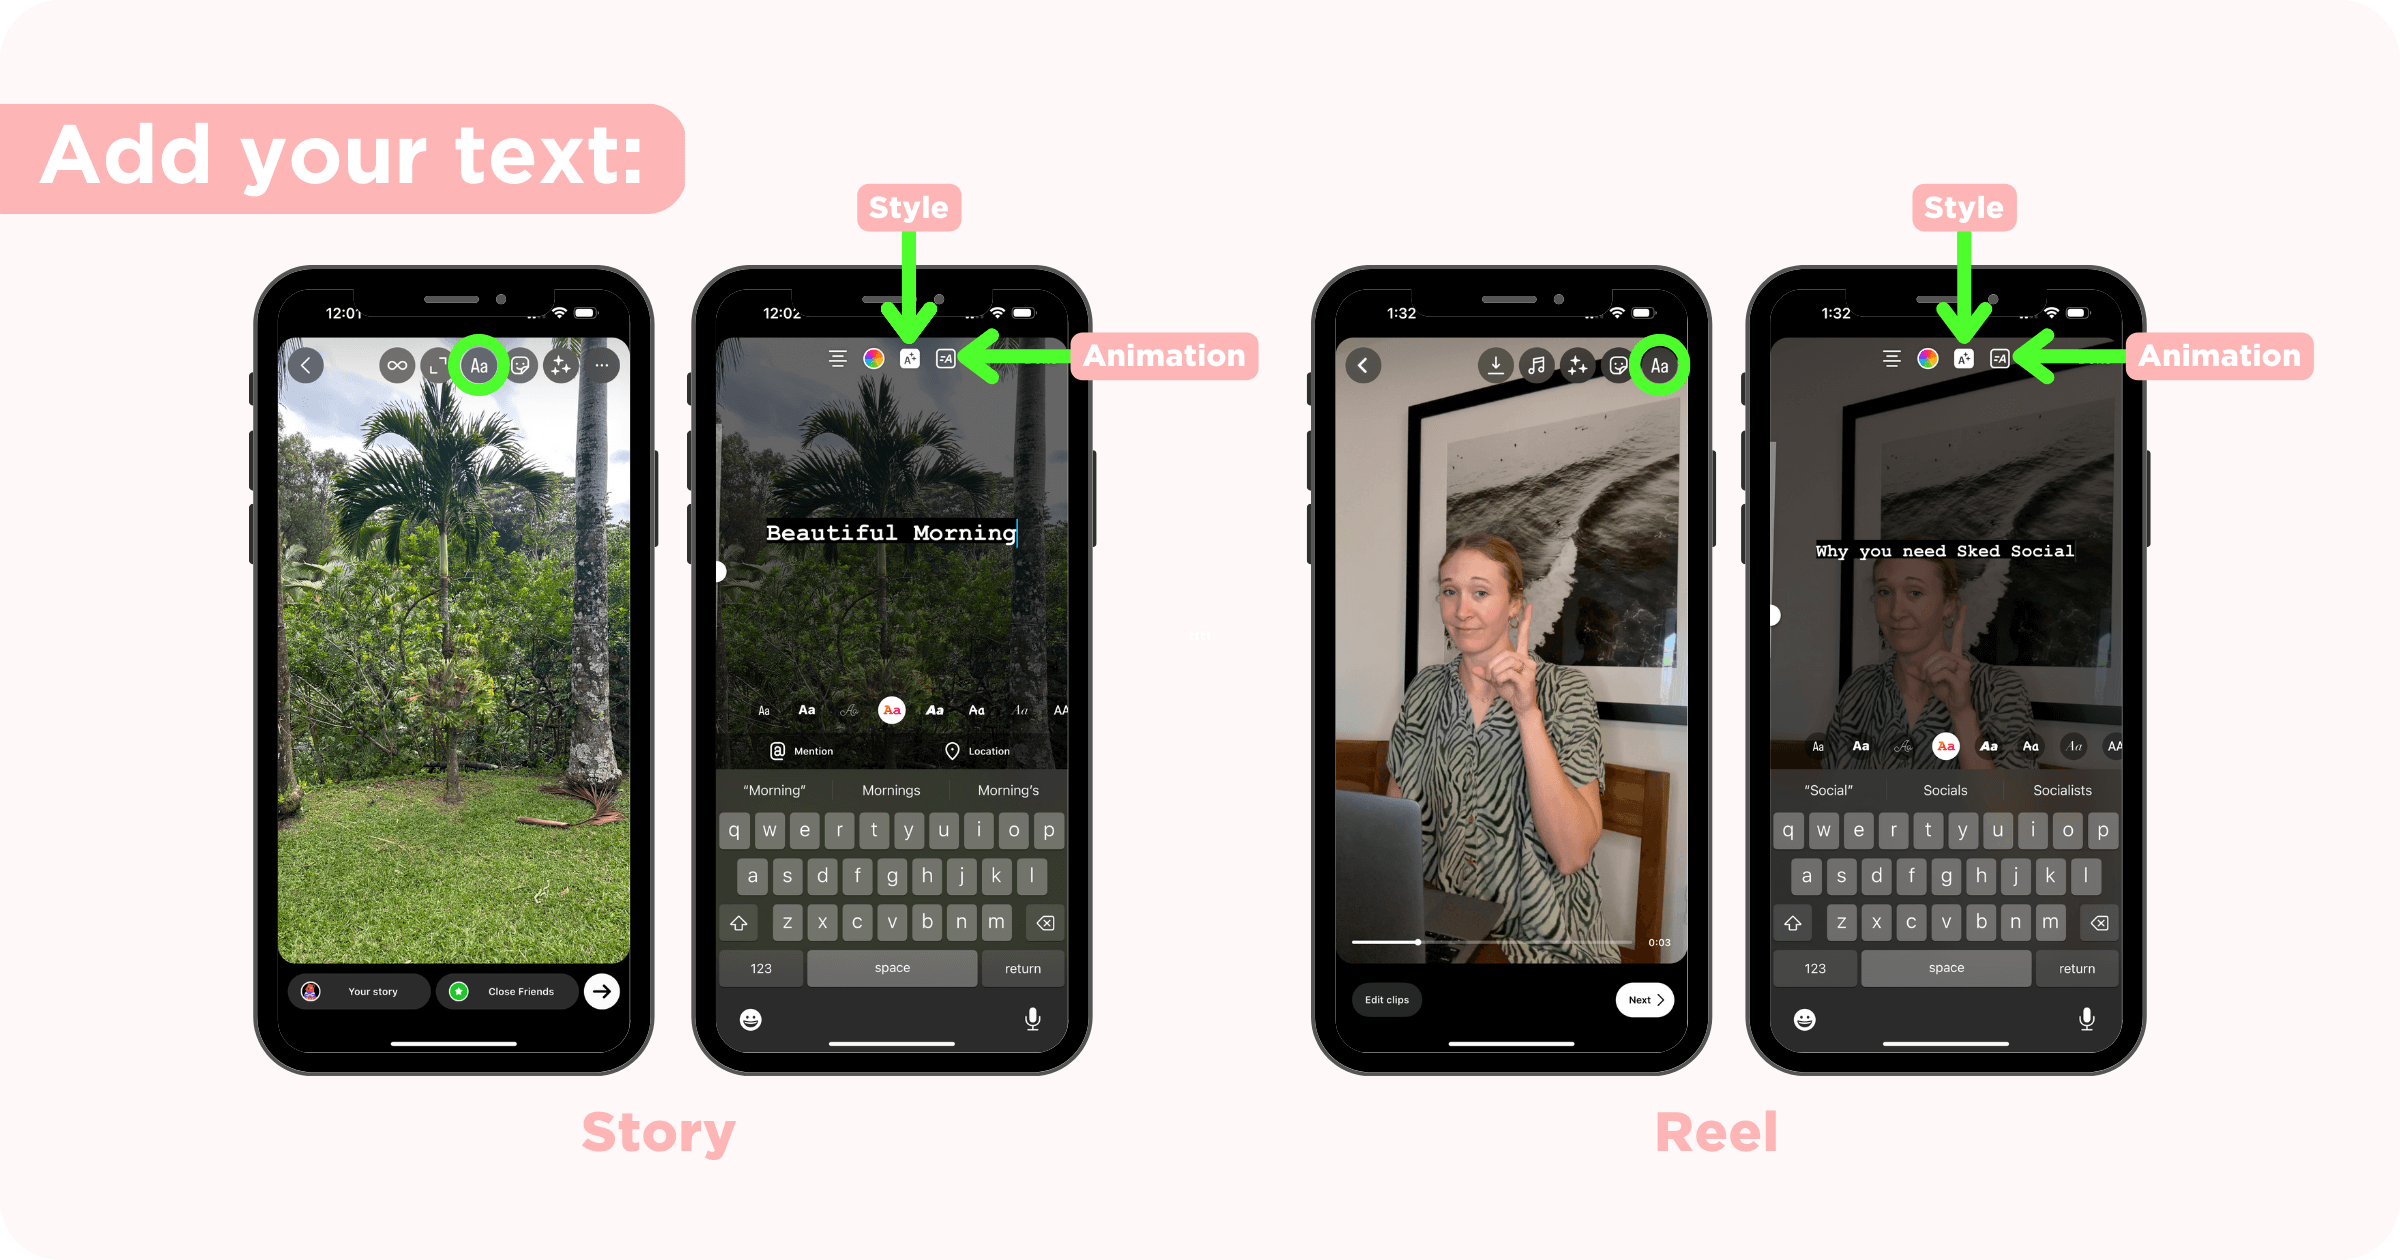
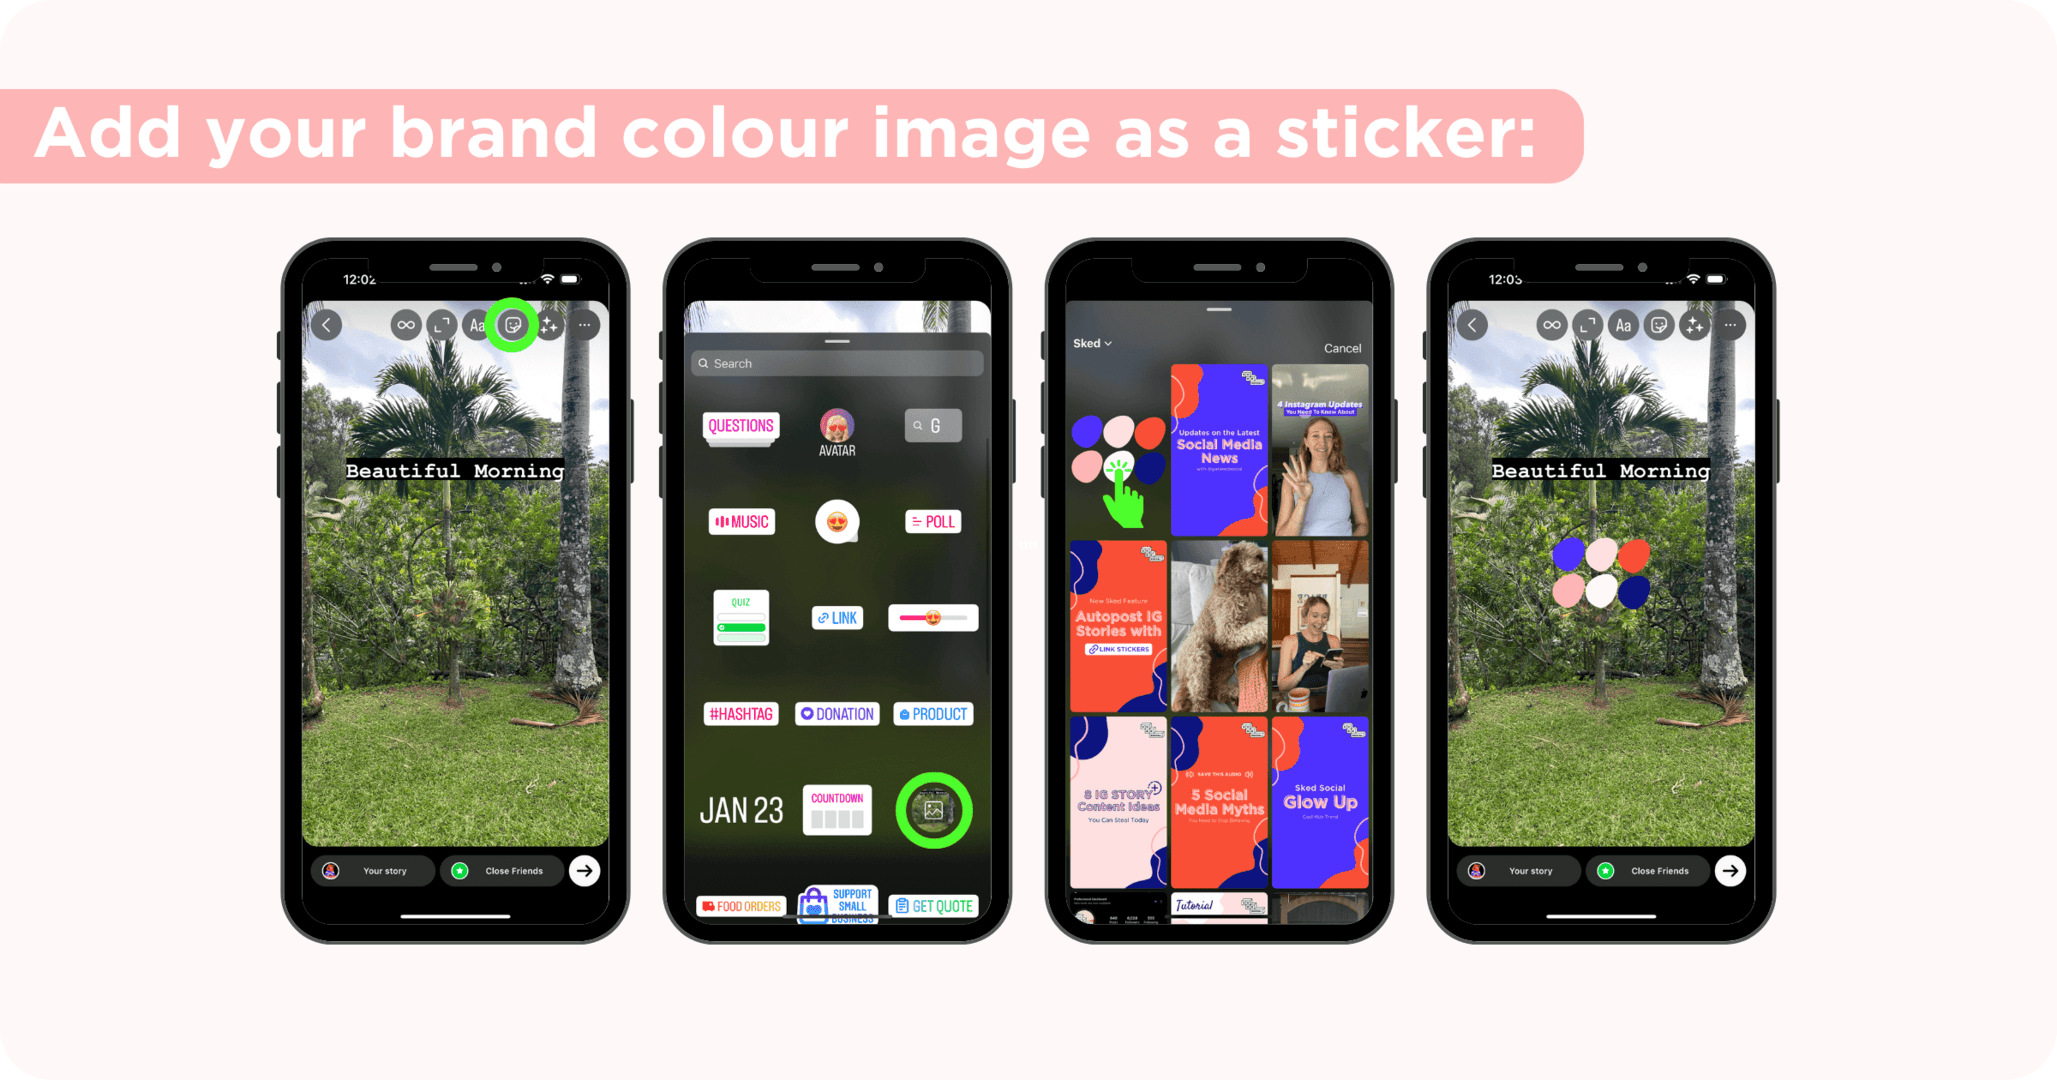
For Stories, some devices may have the image sticker icon right on the screen but if not, you'll find the image option within the sticker tool. Click the sticker tool and locate the image sticker. It'll have an image icon on top of your most recent photo in your camera roll. From there, select the image of your brand colours. The image will now appear on your Story/Reel.
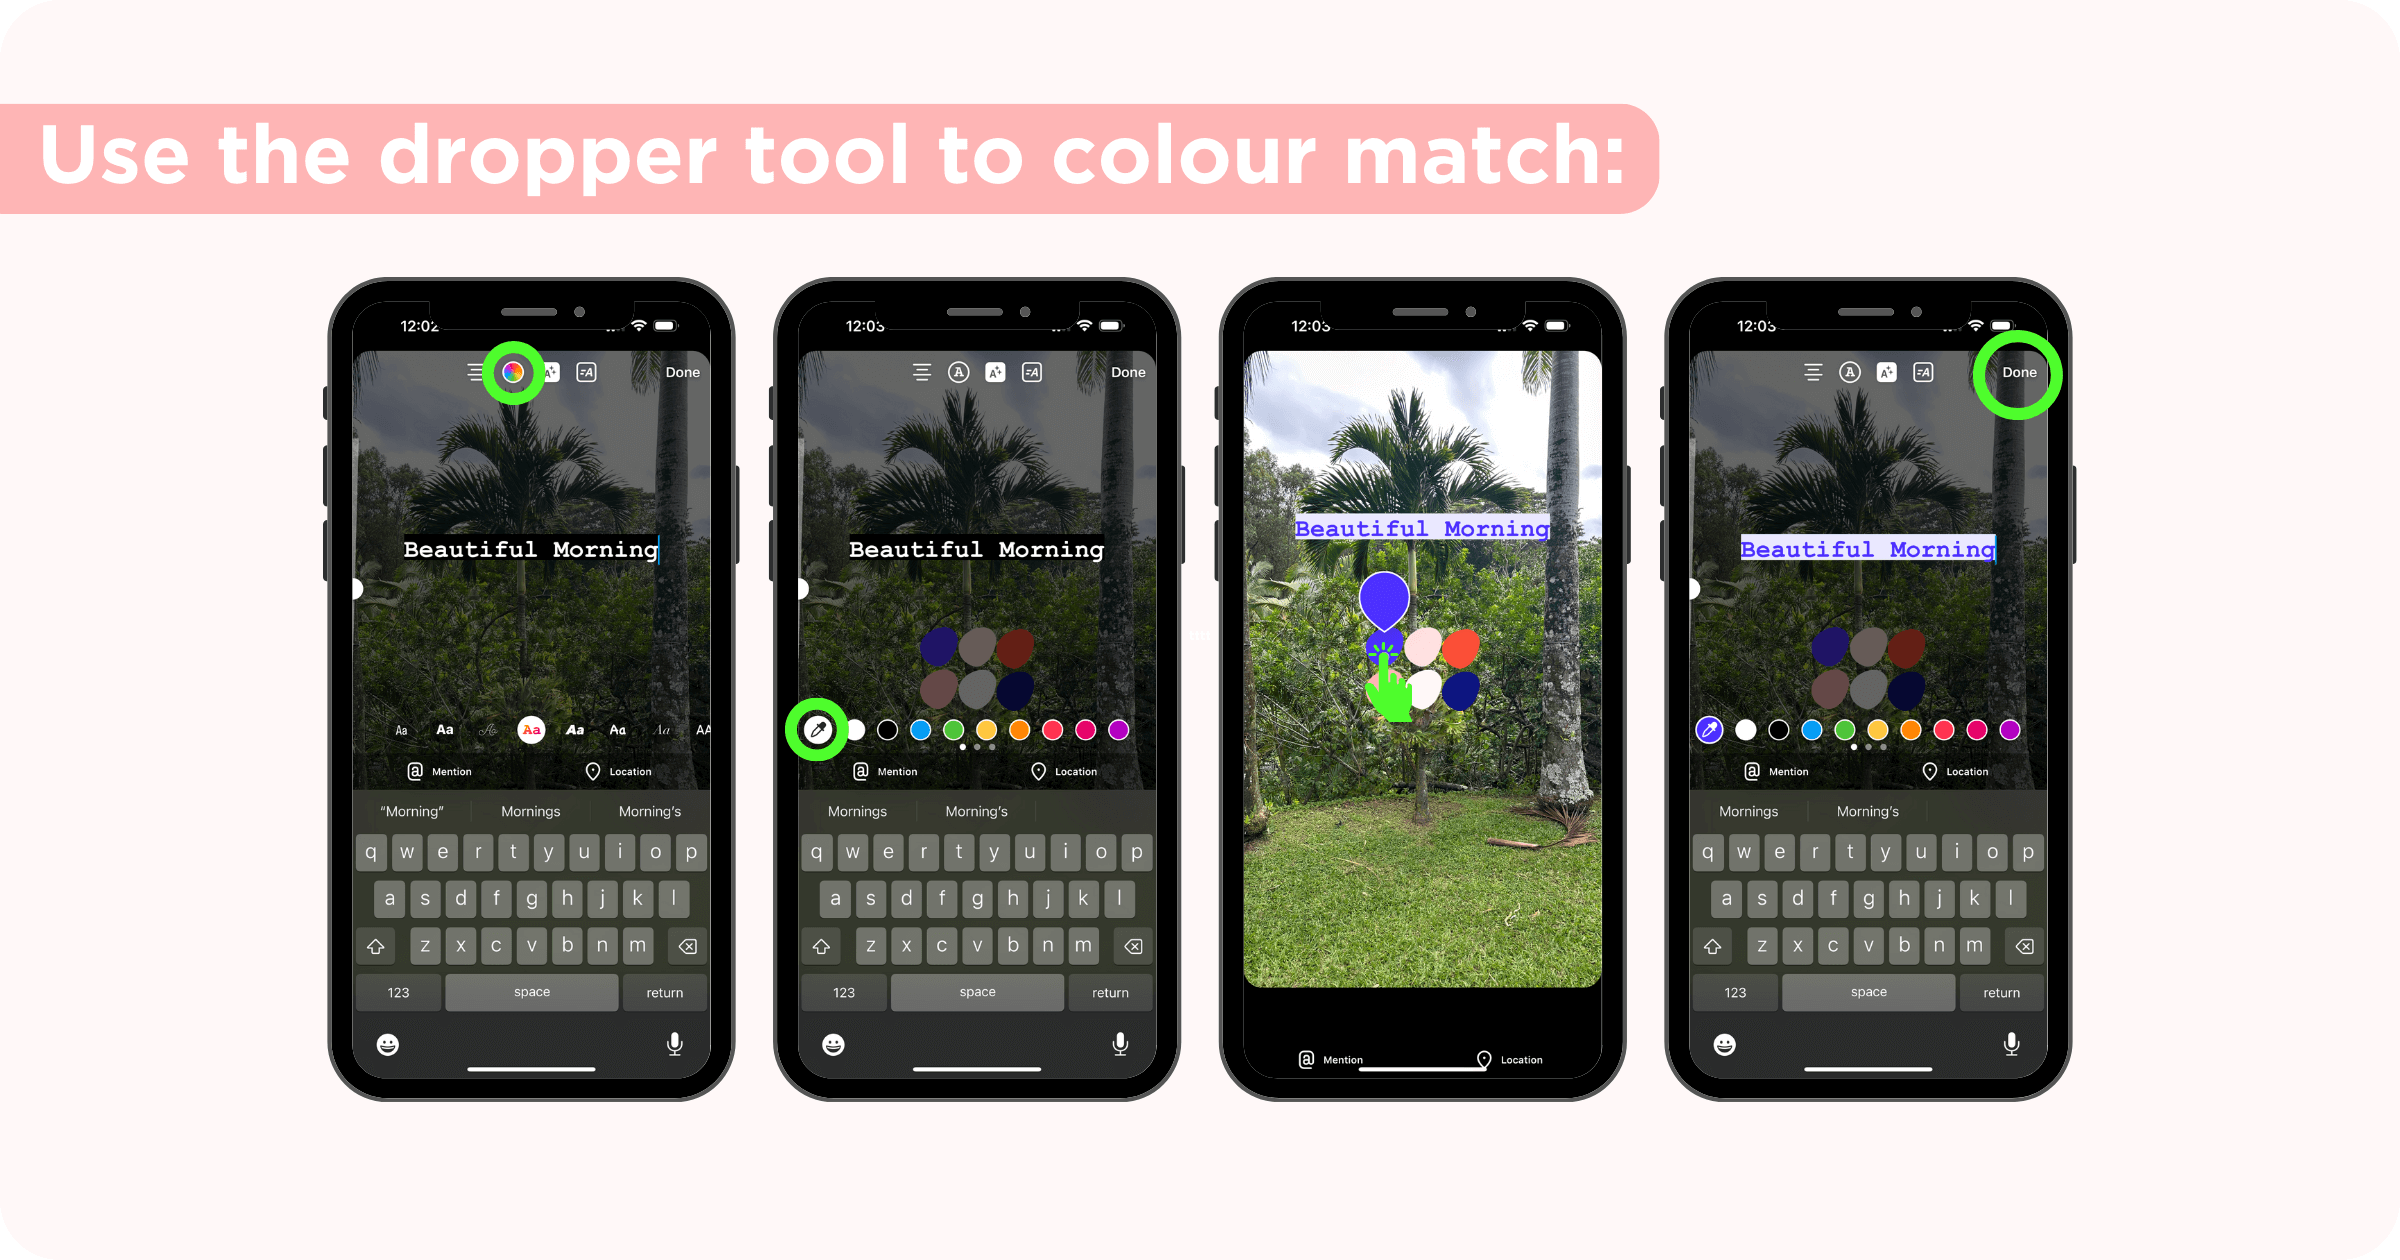
Click on the text to edit it and click on the color wheel. Click the dropper tool on the left and use your finger to drag the dropper over the image of your brand colours to match the text to your desired colour. Click done.
Once you're happy with the colour of your text, we want to delete the image. There are a couple ways to do this.
For Stories:
For Reels:
And there you have it! It may seem like a lot of steps but you'll get really fast using this method.
Get everything social schedulers are missing without writing a blank check for an enterprise platform. AI-integrated tools, custom collaboration and approval workflows, deep analytics and insights, and real auto-posting to more platforms — it’s all here.
Get Started for FREEIf for some reason, the image sticker is not available to you on Instagram, we can still get the image inserted into the Story or Reel without it. This method will start the same as above.
Save an image of your brand colours to your camera roll, start your Story or Reel like normal and type out your text.
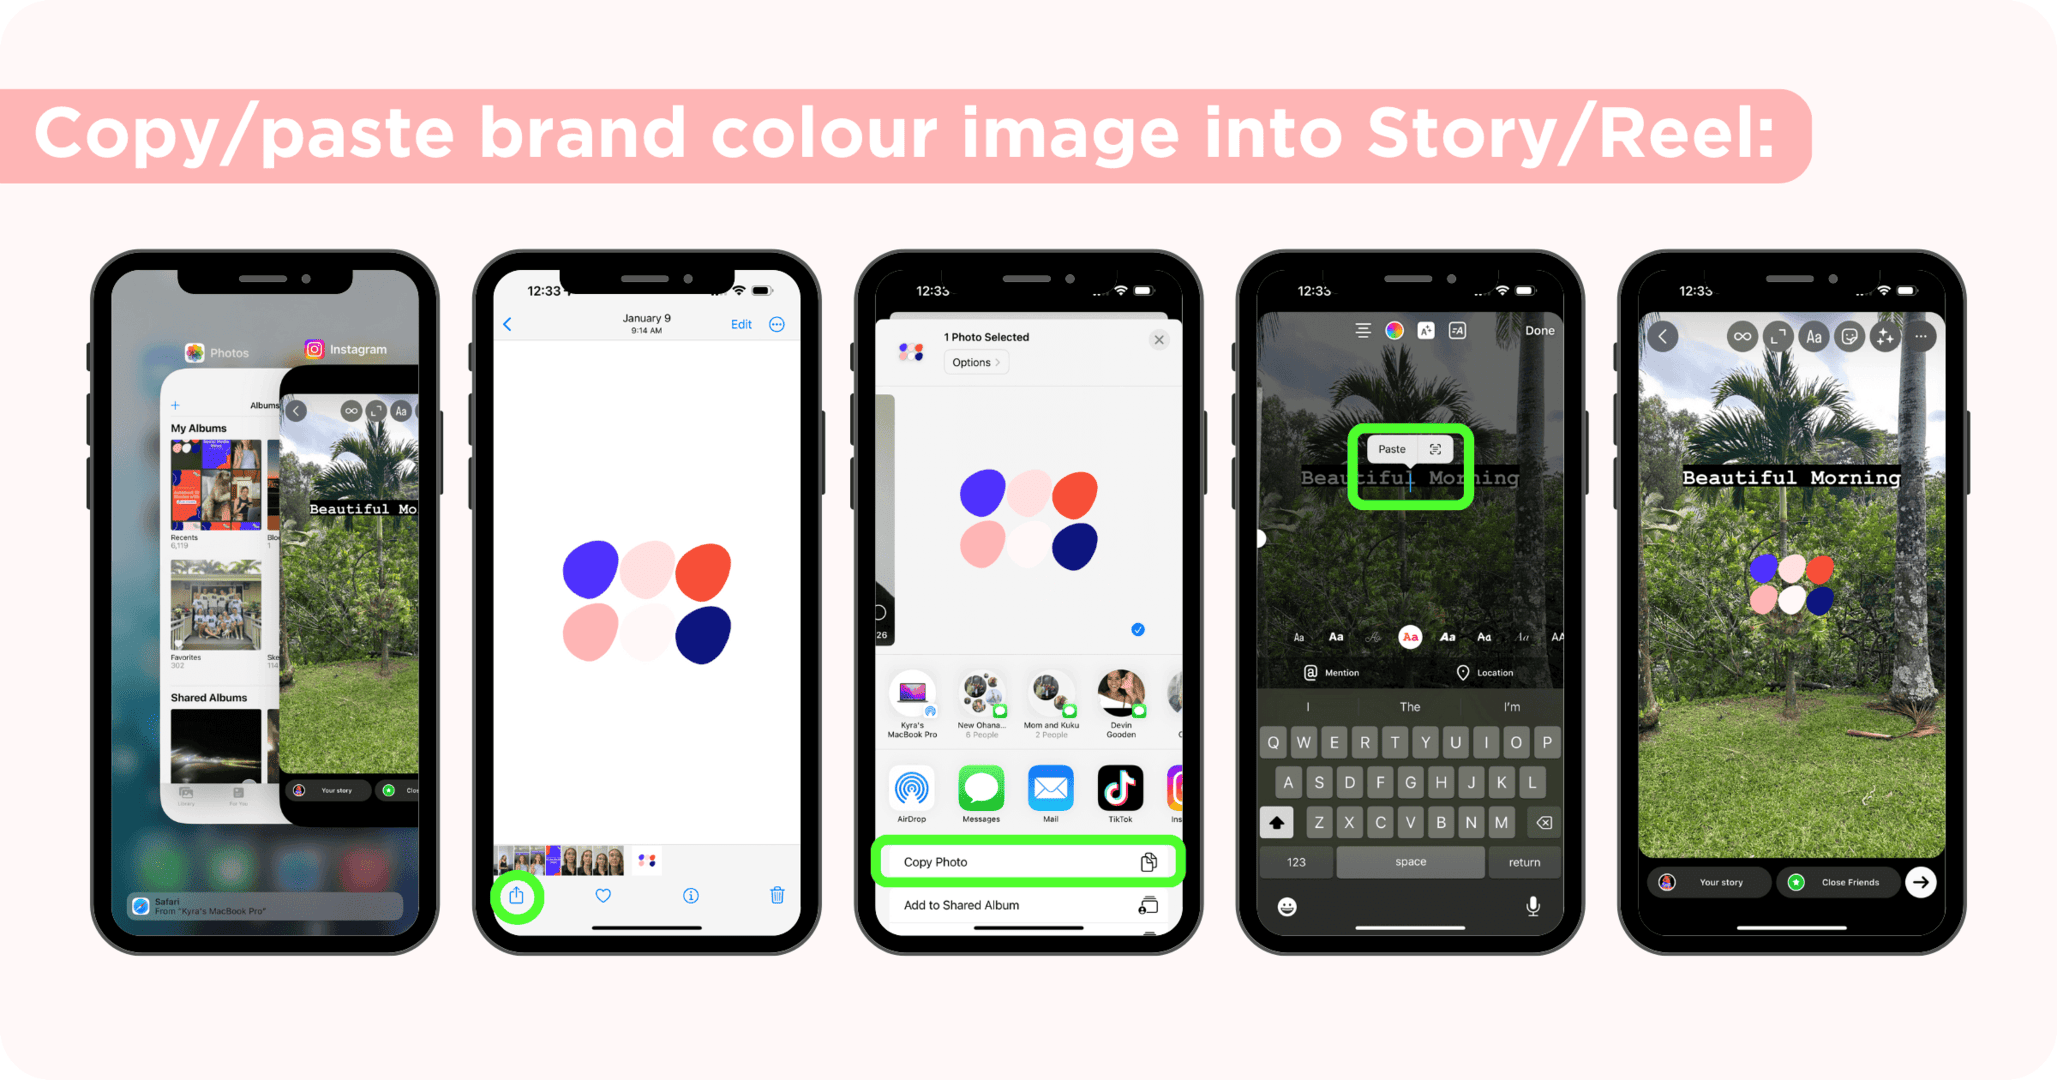
Leave your Instagram Story/Reel open and navigate to your camera roll. DO NOT entirely close the Instagram app. On iPhone you do this simply by dragging your finger up from the bottom of the screen then clicking on Photos. On the image of your brand colours, click the share icon in the bottom right corner and click copy photo.
Go back to Instagram, click the screen as if you were adding text, hold down your finger and release and click paste. Now your image should be on the Story/Reel.
Click on the text to edit it and click on the color wheel. Click the dropper tool on the left and use your finger to drag the dropper over the image to match the text to your desired colour. Click done.
Delete the image by dragging it to the trash.
This method requires you to have already uploaded branded GIFs to GIPHY so that you can access it without leaving Instagram. To learn how to add custom GIFs to GIPHY, check out this article. Once you've finished that, follow the steps below.
Save an image of your brand colours to your camera roll, start your Story or Reel like normal and type out your text.
Click the sticker tool and select the GIF option. Type the keywords you added when you uploaded your GIF to GIPHY to locate your brand GIFs. Click the GIF to insert it onto the Story/Reel.
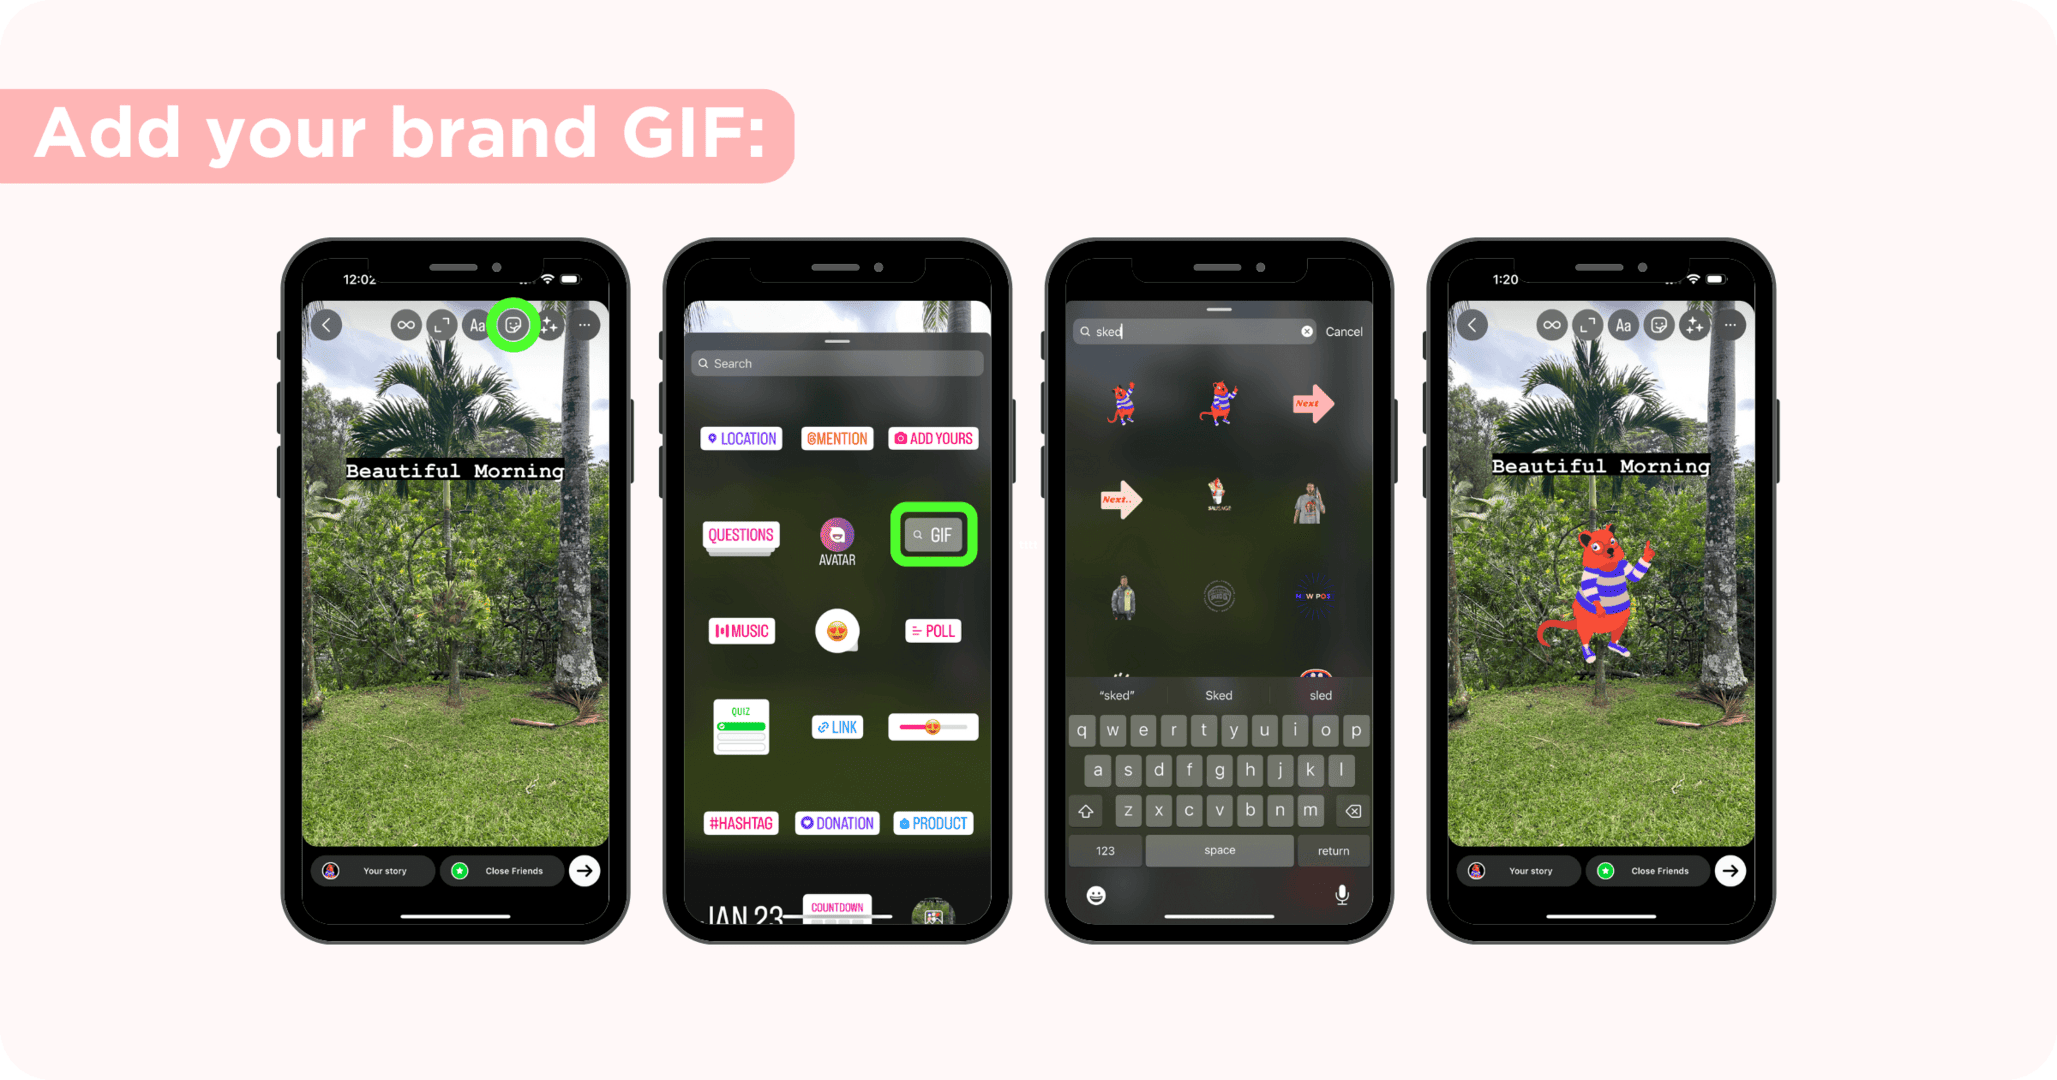
Click on the text to edit it and click on the color wheel. Click the dropper tool on the left and use your finger to drag the dropper over the GIF to match the text to your desired colour. Click done.
Depending on what the GIF is, you may want to leave it on your Story/Reel as a decoration or you can drag it to the bottom of your screen to the trash to remove.
You can also add your text to your Stories and Reels by editing outside of the Instagram app - you'll have a bit more control over the fonts and colours. But I've found that editing natively inside Instagram helps the content seem more authentic for the platform. My favourite third-party apps are Videoleap, InShot and CapCut.


.webp)